In a world filled with high-tech, battery-operated plastic gadgets that beep, flash, and whir, it is easy to forget that a baby’s greatest teacher is their own curiosity. To a six-month-old, a designer wooden rattle and a clean, empty plastic bottle filled with colorful rice are equally fascinating. In fact, the homemade version might even win.
Creating DIY baby toys is about more than just saving money. it’s about sustainability, sensory exploration, and the joy of intentional parenting. By repurposing household items, you reduce waste while providing your child with unique tactile experiences that commercial toys often lack.
In this comprehensive guide, we will explore why DIY toys are beneficial, the safety protocols you must follow, and a massive list of projects categorized by developmental stages.
Why Choose DIY and Recycled Toys?
Before we dive into the “how,” let’s look at the “why.” There are three primary pillars that make homemade toys a superior choice for many families:
1. Sensory Richness
Commercial toys are often “closed-ended.” A plastic keyboard does one thing: it plays a note. However, a Sensory Board made from leftover fabric scraps, sponges, and smooth stones offers a variety of temperatures, textures, and resistances. This helps build complex neural pathways in a developing brain.
2. Environmental Stewardship
The toy industry is one of the largest users of virgin plastics. By upcycling cardboard boxes, egg cartons, and old clothing, you are teaching your child (even at a non-verbal age) that resources have value beyond their initial use.
3. Customization
Every baby develops at their own pace. When you make your own toys, you can tailor the difficulty level to your child’s specific needs. If your little one is obsessed with pulling tissues out of a box, you can create a “forever tissue box” using fabric scraps that they can pull out and you can stuff back in—over and over again.
The Golden Rules of DIY Toy Safety
When you are the manufacturer, the safety inspections are up to you. Babies explore the world with their mouths, so your primary goal is to ensure that every material used is non-toxic and physically secure.
The “Choke Tube” Test
Anything that can fit through the inside of a toilet paper roll is a choking hazard. If a part of your DIY toy (like a loose bead or a button) can fall off and fit through that tube, it should not be used for children under three.
Non-Toxic Adhesives
Avoid industrial glues with strong fumes. Use hot glue (applied generously and cooled completely), non-toxic school glue, or—better yet—mechanical fasteners like sewing or heavy-duty knots.
Texture Checks
Run your fingers over every surface. Is there a sharp plastic edge where you cut a bottle? Sand it down or cover it with heavy-duty cloth tape. Is there a splinter on a piece of reclaimed wood? Sand it until it’s smooth as silk.
Supervision is Mandatory
DIY toys are “active play” items. Because they aren’t factory-tested for durability over months of chewing, you should always supervise your baby while they play with these creations.
Part 1: Toys for Newborns to 3 Months (The High-Contrast Stage)
At this stage, babies are working on their vision and neck strength. They love high-contrast patterns (black and white) and gentle sounds.
1. The High-Contrast Mobile
Newborns see black, white, and gray best.
- Materials: Cardboard scraps, black marker, white paper, a clothes hanger, and string.
- Method: Cut out simple shapes (circles, triangles, stars). Draw bold patterns on them—stripes, dots, and spirals. Hang them from the hanger.
- Play Tip: Hang this over their changing table to keep them occupied during diaper changes.
2. Gentle Wrist Rattles
- Materials: An old, clean sock and a few large bells (securely sewn inside).
- Method: Cut the toe off a soft sock to create a “cuff.” Securely sew a bell inside a small pouch of fabric, then sew that pouch onto the cuff.
- Benefit: This helps the baby realize that when they move their arms, they can create sound (cause and effect).
Part 2: Toys for 4 to 7 Months (The Grasping & Reaching Stage)
This is when babies start to sit up and use their hands to explore. They love “mouthing” objects and shaking things.
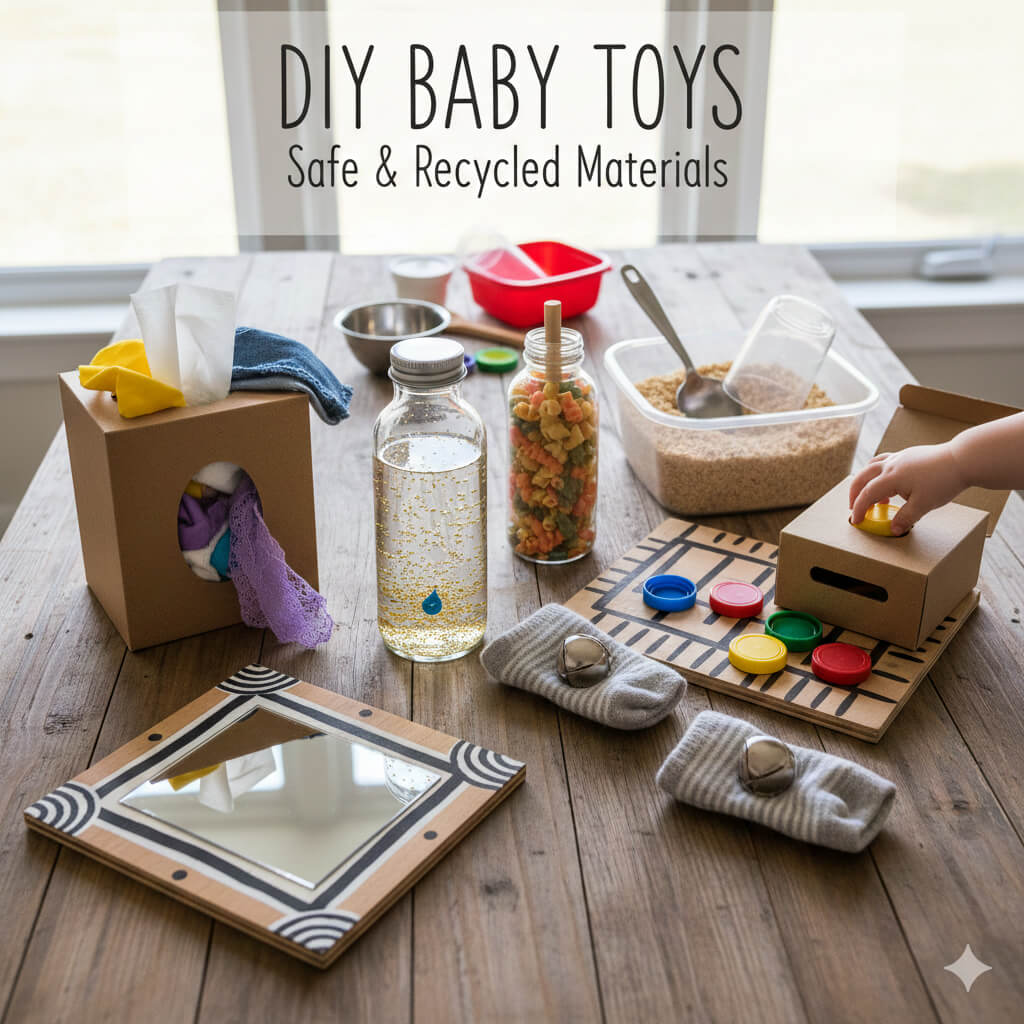
3. The Magic Sensory Bottle
This is the “Holy Grail” of DIY toys.
- Materials: A clean, clear plastic VOSS bottle or any sturdy water bottle, water, glitter, food coloring, and super glue.
- Method: Fill the bottle with water and a drop of food coloring. Add glitter, sequins, or small plastic beads. Crucial Step: Apply super glue to the threads of the cap before screwing it on tightly to prevent leaks or choking hazards.
- Variety: You can also make “Dry Shakers” by filling bottles with dried beans, rice, or pasta to create different sounds.
4. Fabric Scraps “Tissue Box”
Babies love pulling things out of containers.
- Materials: An empty, sturdy cardboard tissue box and various fabric scraps (silk, cotton, denim, lace).
- Method: Stuff the scraps into the box. Show your baby how to pull them out.
- Benefit: This builds fine motor skills and tactile awareness.
5. The Low-Profile Mirror Board
- Materials: A large piece of cardboard and an unbreakable acrylic “locker mirror” (available at craft stores).
- Method: Glue the mirror to the cardboard and decorate the borders with high-contrast patterns.
- Play Tip: Place this on the floor during “tummy time.” Babies are fascinated by faces—especially their own!
Part 3: Toys for 8 to 12 Months (The Problem-Solving Stage)
As your baby approaches their first birthday, they become little engineers. They want to know how things fit together, how things fall, and how to make a mess.
6. The Cardboard Drop Box
- Materials: A shoe box and several plastic lids (from juice jugs or milk cartons).
- Method: Cut a slit in the top of the shoe box just wide enough for the lids to fit through.
- Benefit: This teaches object permanence—the idea that even though the lid disappeared into the box, it still exists and can be retrieved.
7. The Kitchen Percussion Set
- Materials: Plastic Tupperware, metal mixing bowls, wooden spoons, and whisk.
- Method: No construction required! Simply set these on a low shelf or the floor.
- Benefit: This is the ultimate “auditory sensory” experience. Metal makes a high “ting,” while plastic makes a dull “thud.”
8. Edible “Sand” (Sensory Bin)
- Materials: A shallow plastic bin and a box of Cheerios or puffed rice.
- Method: Pulse the cereal in a blender until it looks like sand. Pour it into the bin and hide “treasures” (large measuring spoons or big plastic cups) inside.
- Benefit: Traditional sand is messy and not safe to eat. This version is 100% taste-safe for babies who still put everything in their mouths.
Part 4: Advanced DIY — The Ultimate Sensory Wall
If you have a spare afternoon and a large piece of plywood or heavy cardboard, you can create a Sensory Wall (or Busy Board). This is a long-term toy that can grow with your child.
Items to Include on Your Board:
| Item Category | Examples | Skill Developed |
| Texture | A piece of artificial turf, a swatch of velvet, sandpaper. | Tactile discrimination |
| Sound | A bicycle bell, a small xylophone key, a squeaky toy. | Auditory cause-and-effect |
| Fine Motor | A large plastic zipper, a chunky door bolt, a light switch. | Dexterity and pincer grasp |
| Visual | A spinning wheel (made from a CD), a mirror, bright colors. | Visual tracking |
Export to Sheets
Installation Tip: If using a heavy board, ensure it is securely bolted to the wall or used only while laying flat on the floor to prevent it from tipping over onto the baby.
Part 5: Managing the Mess — Organization and Rotation
One downside of DIY toys is that they can start to look like… well, trash. To keep your home feeling like a home and not a recycling center, follow these tips:
- The 5-Toy Rule: Don’t put everything out at once. Put out 5-7 items and keep the rest in a “toy closet.”
- Weekly Rotation: Every Sunday, swap the toys. When a baby hasn’t seen the “Sensory Bottle” for a week, it becomes a brand-new, exciting object all over again.
- Triage Your Toys: Recycled toys have a shelf life. When a cardboard box gets soggy or a tape edge starts to peel, thank it for its service and put it in the recycling bin. The beauty of DIY is that you can always make another one.
Deep Dive: The Science of Play with Recycled Materials
Psychologists often refer to items like boxes, sticks, and lids as “Loose Parts.” Unlike a “Fixed Part” toy (like a plastic toy car which is always a car), a “Loose Part” can be anything. A cardboard box is a car today, a house tomorrow, and a drum the day after. By providing your baby with these open-ended materials, you are fostering divergent thinking—the ability to see multiple solutions to a single problem.
The Role of “Mundane” Objects
Have you ever noticed your baby ignores their expensive toys to play with your keys or a TV remote? This is because babies are wired to imitate adults. They want to use the “tools” that they see you using. By creating toys out of “real world” materials like sponges, whisks, and containers, you are validating their desire to participate in the “real world.”
Summary Checklist for the DIY Parent
- [ ] Safety: No small parts, no sharp edges, no toxic glues.
- [ ] Sensory: Does it feel, sound, or look interesting?
- [ ] Purpose: Does it help with a specific skill (grasping, crawling, sitting)?
- [ ] Sustainability: Can I recycle this when the baby outgrows it?
Conclusion
Creating DIY baby toys is an act of love that pays dividends in your child’s development. It moves us away from the “disposable” culture of modern consumerism and back to a simpler, more tactile way of learning. Your baby doesn’t need a $100 subscription box to learn about the world; they just need a safe space, a few interesting textures, and a parent who is willing to get a little bit messy.
The next time you’re about to throw away an oatmeal container or a finished roll of paper towels, stop and look at it through your baby’s eyes. It isn’t trash—it’s the beginning of a brand-new adventure.